

Waffle Flower Christmas Challenge
This post is for the Waffle Flower July 2021 Christmas Challenge. The products used are primarily Waffle Flower products listed below. I have always enjoyed making Christmas cards and got carried away and made 18 cards. It’s great that I have such a head start on making Christmas cards.
Do check out the video below to watch how I created these cards.


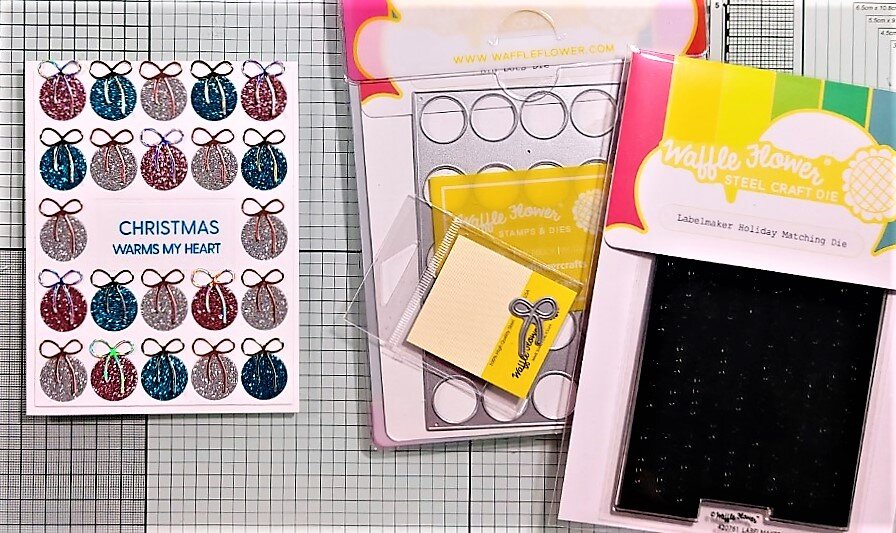


Card #1, Big Dots - Christmas Warms My Heart

I started making cards for this Waffle Flower Christmas Challenge without any Waffle Flower Christmas stamps or dies - that’s why I decided to use the Waffle Flower Big Dots Die. Inlay the dots with glitter card from Concord & 9th Summer Glitter Pack (for the blue and rose pink) and silver glitter card from Craft Perfect Silver Screen. Then I die cut tiny bows with the Waffle Flower Tiny Twine Bow Die with metallic card (rose pink, gold and silver) and converted the dots to baubles.

For the sentiment used two different Waffle Flower Oversized stamps: (1) ‘Christmas’ is from the Oversized Merry stamp; and (2) ‘Warms My Heart’ is from the Oversized Grace & Kindness stamp. Inked stamp with Versamark ink and embossed with Cosmic Shimmer Persian Sea Aurora.
Card #2, Poinsettia - ‘Tis the Season

Ink blend with Ranger Distress Inks (Pine Needles, Cracked Pistachio, Evergreen Bough, and Iced Spruce). Use and ink blending tool with dome shaped foam for easy blending on Strathmore Bristol Smooth Paper Pad.
Spritz some water onto card panel as water reacts with distress inks. Then die cut with Waffle Flower Poinsettia Panel Die. Wipe off excess moisture on card and see results of lovely droplet marks on the ink blended panel.

Use Poinsettia Panel Die again and die cut some flowers in red cardstock. Inlay red die cut flower after inking the petal edges with Aged Mahogany distress ink. Added red gems, Jewels - Cherry Mix from Lucy’s Shop.
Sentiment is from Waffle Flower Labelmaker Holiday Combo. Stamped with Versafine Onyx Black ink and heat embossed clear embossing powder (to give it that shine) with WOW Dual Speed Heat Tool. Die cut stamped sentiment using the coordinating die, which makes it so easy to get many sentiment stamped and cut perfectly at the same time - what a time saver!

Added another layer of flowers to to some of the flowers and adhered tiny pearl gems to the flower centres. Backed panel with fun foam and adhered to A2 card panel.
Card #3, Dotty Christmas Tree - ‘Tis the Season

Die cut a smaller card panel using the Waffle Flower A2 Layers Die and inserted brads into the resulting holes that form a triangle representing a christmas tree.

Sentiment is from Waffle Flower Labelmaker Holiday Combo. Stamped with Versafine Onyx Black ink and heat embossed clear embossing powder (to give it that shine) with WOW Dual Speed Heat Tool. Die cut stamped sentiment using the coordinating die.
Card #4, Dotty Christmas Tree - Merry & Bright

Same as card #3 but used buttons instead of brads. After die cutting card panel, adhered a card of the same sizes behind die cut panel. This will allow glue applied to the die cut holes so buttons can be adhered. Then pierced holes in the buttonholes with a piercing tool.

Used a thread and needle to sew on the buttons as I thought he thread on the front of the buttons looks prettier. Adhered foam strip adhesive to back of card panel and adhered to an A2 pink card.
Card #5, Dotty Christmas Tree - Merriest Wishes

Same as card #4 but used pastel coloured buttons and randomly arranged colours.

Card #6, Snowflake - Sending Warm Wishes

Ink blend card panel with Ranger Distress Oxide inks Tumble Glass, Peacock Feathers, Blueprint Sketch, and Chipped Sapphire. Allow time for ink properly.
Prep inked card panel with anti-static powder bag and stamp Galina’s Snowflake stamp with Versamark ink. Sprinkle with Ranger Super Fine White Embossing Powder and heat emboss with WOW Dual Speed Heat Tool.

Then die cut card panel with Waffle Flower Classic Snowflake Die. Also die cut a few times using white card to layer the large snowflake. Adhere large die card to inked and embossed card panel and attach to an A2 card.
Sentiment is from Waffle Flower Labelmaker Holiday Combo. Stamped with Versafine Onyx Black ink and heat embossed clear embossing powder (to give it that shine) with WOW Dual Speed Heat Tool. Die cut stamped sentiment using the coordinating die.

Embellishment of sequins are from Nuvo Pure Sheen Sequins, Let It Snow which comprises Ice White, Silver Tinsel, Aqua Aurora, and Sapphire Blue. Adhere using Art Glitter Liquid Glue with fine metal tip and Marvy Uchida Jewel Picker
Card #7, Snowflakes - May Your Days be Merry and Bright

The stamping on this card works best with a stamping tool so the stamped snowflake images on the A2 base card and the slightly smaller than A2 card size card panel match up. Arrange the individual eight snowflake stamps from Galina’s Snowflake stamp on the A2 card base and ‘pick up’ with stamping platform door. Ink stamp with Altenew Limestone Crisp Dye Ink. After stamping on the A2 card base, leave stamp in place and also stamp on an A2 size card panel. Repeat until entire A2 base card and A2 card panel is completely covered with snowflake images.
Then stamp the snowflakes individually on a separate white card panel with Versafine Deep Lagoon, Habanero, Spanish Moss, and Satin Red. Die cut the snowflakes using the Galina’s Snowflake dies.

Die cut stamped A2 card panel to slightly smaller than A2 size using the Waffle Flower A2 Layers Die, back with fun foam and adhere to the stamped A2 card base matching up the snowflake images.
Attach some of the die cuts with liquid glue and some with Stick It 3D Foam Square to the slightly smaller than A2 sized card panel.

Sentiment is from the Wonderful Christmas Combo stamp set. Stamp on red card stock and heat emboss Ranger Super Fine White Embossing Powder. Die cut with coordinating die and stack with multiple die cuts for dimension and adhere to card front with Stick It 3D Foam Square. Finally embellish with shiny white gems.
Card #8, Snowflake Shaker - Merry & Bright

Ink blend an A2 sized Strathmore Bristol Smooth Paper with Ranger Distress Oxide inks, Seedless Preserves, Blueprint Sketch, and Abandoned Coral. Apply inks randomly. Place Waffle Flower Snowflake Background Stencil on inked panel. Use a damp stamp shammy and remove ink through the stencils as the distress ink is reactive to water.
Die cut this panel with My Favorite Things Stitched Wonky Rectangle Dienamics so the rectangle is slightly smaller than A2 size. Then use a circle die that is slighly larger than the circle in the middle of the Waffle Flower Circle Snowflake Shaker Die to die cut a circle in the middle of the inked card panel. Also use the same circle die to die cut a piece from a transparency film sheet (which is cheaper than acetate). You can also use the backing sheet of a stamp sheet.

Die cut the Circle Snowflake Shaker Die twice with white cards an once with a beige pearlescent card. Layer the die cuts and the final white snowflake die cut at the top, offset slightly so the beige pearlescent snowflake die cut shows through a little. Adhere the die cut circle transparency film with Art Glitter Liquid Glue with fine metal tip at the back of the layered snowflake die cuts. Then attach a double layer of foam strip adhesive on the outer circle of the circle transparency film. The double layer of foam strip gives the circle soem depth so the shaker embellishment have space to move.

For the shaker element, place some gems primarily of Lucy’s Shop Ice Cystal Sequin Mix in the middle of the inked panel die cut circle and then (after removing the backing from the foam strip adhesive around the circle of the round transparency film) adhere over the gems in the middle, trapping the gems inside the circle transparency film thus creating a shaker. Add a few more Ice Cystal Sequin Mix around the snowflake shaker with Art Glitter Liquid Glue with fine metal tip.
Sentiment is from Waffle Flower Labelmaker Holiday Combo. Stamped with Versafine Onyx Black ink and heat embossed clear embossing powder (to give it that shine) with WOW Dual Speed Heat Tool. Die cut stamped sentiment using the coordinating die.
Card #9, Snowflake Shaker - Merry & Bright (2)

Same as card #8, except the Ranger Distress Inks used are Mustard Seed, Spiced Marmalade, Fired Brick, and Seedless Preserves.
Card #10, Snowflake Shaker - Merry Christmas

Same as card #9 except for the following. Ranger Distress Inks used are Worn Lipstick, Stormy Sky, Scattered Straw, and Shabby Shutters. Shaker embellishments are Lullaby Sparkly Shaker selection from Lucy’s Shop. The sequins on the card front are Altenew Satin White sequins.
Card #11 - Tidings of Comfort & Joy

Ink blend an A2 sized Strathmore Bristol Smooth Paper with Ranger Distress Oxide inks, Tattered Rose, Abandoned Coral, and Seedless Preserves. Place Snowflake Background Stencil on inked panel and spread Altenew Embossing Paste over stencil. Before the embossing paste dries, remove stencil and sprinkle silver glitter. Leave aside overnight to dry.
Die cut a transparency film sheet to A2 size with Waffle Flower A2 Layers Die. Adhere the transparency film sheet to the inked and glittered card panel by applying liquid glue to the edged of the card panel. Place transparency on inked panel and place something heavy on the card panel with transparency to ensure it stays in pace until glue is dried.

Then use two different sized rectangle dies from Waffle Flower A2 Layers Die to die cut a frame with beige pearlescent card. Pop up frame with foam strip adhesive and adhere onto transparency film covered inked card panel.

Die cut ‘Joy’ in beige pearlescent card and then another three time with white card. Adhere die cut layers for dimension. Adhere die cut layered ‘Joy’ to card front with liquid glue. For the sub-sentiment, heat emboss ‘tidings of comfort &’ from Oversized Joy stamp on grey cardstock with Ranger Super Fine White Embossing Powder. Cut down the emsbossed sentiment and adhere to card front with foam strip adhesive.
Card #12 - Sending Christmas Joy

Same as card #11, except for the Ranger Distress Inks used, Chipped Sapphire, Peacock Feathers, and Speckled Egg. Frame and ‘Joy’ die cut with white cardstock.
Card #13 - May your Christmas be filled with Joy

Same as card #12, exceot the card is not ink blended by a blue card from Scrapbook.com, Cool Smooth Cardstock.
Card #14 - Merry and Bright

Same as card #12 except for the following. Ranger Distress Inks used are Twisted Citron, Salty Ocean, and Blueprint Sketch. Main sentiment and sub-sentiment from Oversized Merry Combo.
Card #15, Nesting Christmas Die - It’s a Wonderful Life

Die cut 110lbs Neenah Solar White Cardstock with Waffle Flower Nesting Christmas Die. Place Altenew Halftone stencil on die cut panel and ink with Altenew Dusk, Ocean Waves, and Sea Glass Crisp Dye Inks from the Cool Summer Night Crisp Dye Ink set.

Punch corners with a corner puncher. Cut another card with the corners rounded and sew on some buttons to cover space underneath the die cut christmas tree shape.

Sentiment is from the Wonderful Christmas Combo stamp set. Stamp on white cardstock and heat emboss Hero Arts Gold Embossing Powder. Die cut with coordinating die and stack with multiple die cuts for dimension and adhere to card front with Stick It 3D Foam Square.
Card #16, Nesting Christmas Die - From Our Home to Yours

Die cut dark blue cardstock with Waffle Flower Nesting Christmas Die and dry emboss with Christmas Texture Fades Snowfall and Speckles Embossing Folder. Use a finger dauber and apply Colorbox Frost White Pigment Ink on the dry embossed raised snowfall dots.

Same as card #15, instead of buttons adhere ribbons and Nuvo Pure Sheen Festival Gold sequins.
Sentiment is from Waffle Flower Labelmaker Holiday Combo. Stamped with Versamark ink and heat embossed Hero Arts Gold Embossing Powder with WOW Dual Speed Heat Tool. Die cut stamped sentiment using the coordinating die and adhere to card front.
Card #17, Nesting Christmas Die - All is Calm All is Bright

Same as card #16, except adhere various sized faux pearl gems and the sentiment is same as card #15.
Card #18, Nesting Christmas Die - Merriest Wishes

Die cut white cardstock with Waffle Flower Nesting Christmas Die and then dry emboss white cardstock panel with Waffle Flower Poinsettia Panel Die. Just as cards #16 and #17 adhere ribbon (this time grosgrain ribbon) to a separate card panel and place underneath die cut.

Back die cut and dry embossed card panel with foam strip adhesive and adhere to panel with ribbon strips. Attach some Lucy’s Shop Ice Cystal Sequin Mix to card front. Place a grey satin ribbon bow at the top of the christmas tree die cut and adhere with liquid glue. Sentiment just as card #10.

Attach entire panel to A2 side folding card.
Thank you for stopping by and do leave a comment if you have a query or if you just want to.