

Altenew Level 1 Final Challenge (Part 1 - Card Set for Her)


WARNING: This is a long post with lots of pictures, tips, and also a video. Sit back and enjoy with your beverage of choice! I detail the steps to make the cards below, alternatively you could just watch the video and see the steps. I would appreciate comments/thoughts with regards to this post and the video -I shall see it as a learning curve for further improvement!
This post shows how I made a Card Set for Her - this is for the Level 1 Final Challenge of Altenew Educators Certification Program (AECP), part 1. It would make an ideal Christmas gift.
The challenge specifications are to create one set of Masculine cards and one set of Feminine cards using at least three techniques picked up from AECP Level 1 Courses. This post only showcases the Feminine cards and the next post will showcase the Masculine cards. A recycled item should also be used in the packaging and/or as part of the cards.
The AECP Level 1 Techniques used:
Clean & Simple Boutique Cards
Easy Die Cutting Techniques
Easy Ink Blending
All about Layering
Let It Shine
Initially I was quite apprehensive with this task but when I started it and tried not to overthink it, I got into the swing of things and enjoyed the process. I try to detail all of the products I use for each card, though there is a list of generic craft products used in card making that I list towards the end of this post.
Main product used for this card set is the Altenew Majestic Bouquet set which includes a 6” by 8” stamp set, coordinating die set, and 3D Embossing Folder. I also chose a set of colours from my stash of Altenew Crisp Dye Inks to coordinate all six cards in this set.


Do watch the video below to see how I created these cards and the packaging for this set of cards for Her - it will make a great Christmas gift.


Card #1: Layering and Masking, Have a Super Day

Steps to make card:
Stamp outline image larger flower from the Altenew Majestic Bouquet stamp on 80lbs Neenah Solar White Cardstock with Altenew Crisp Dye ink Silver Lake. The aim is to achieve a ‘no line’ colour effect. TIP: Use a light ink for the outline stamp of a layered image, if you want to achieve a ‘no line’ stamping effect.
Stamp images again on masking paper and fussy cut. TIP: When fussy cutting an image, move paper and not scissors for a smoother cut and it is also much easier.
After stamping outline image of larger flower, place mask over larger flower and stamp outline image of smaller flower overlapping the large flower as this will make the smaller flower look like it’s behind the larger flower. [I kinda fogot to place the mask on the large flower when using the layering stamps, hence the die cut larger flower - always a way to save a card:)]
Next place mask on both flowers and stamp outline leaf images around the flowers.
Follow Altenew Majestic Bouquet stamp layering guide and stamp the layers as marked on the plastic storage sheet for the flowers and leaves. TIP: When placing layered stamps to align to image, stand over image and look directly down to get accurate stamping.
For larger flower use Altenew Crisp Dye inks Butternut, Chamomile, Marigold and for the flower centre use Mountain Mist, Volcano Lake, and Gold Embossing Powder. Stamp on 80lbs Neenah Solar White Cardstock. Use coordinating die and die cut flower.
For the smaller flower use Altenew Crisp Dye Inks, Marigold, Firebrick, and Mahogany Bark and for the flower centre use Cloudy Sky and Nimbus.
For the leaves use Altenew Crisp Dye Inks, Cloudy Sky, Nimbus, and Dark Night.
When doing a lot of stamping it’s really handy to have a stamp shammy to clean the stamps in between inks. TIP: A stamp shammy is environment-friendly (reusable) and leaves no lint on surfaces cleaned.
After completing all the layered stamping, place masks of flowers and leaves over stamped images and lightly apply Altenew Crisp Dye ink Chamomile around the flowers and leaves. Use Altenew Small Blending Tool for light ink application.
Cut card panel to slightly smaller than an A2 card (4.25” by 5.5”) and adhere die cut larger flower to card panel with foam squares.
Now to get the base card ready. Use a side folding A2 card made from 110lbs Neenah Solar White Cardstock and adhere a matt of black card measuring an A2 size so it will form a thin black frame when the card panel from #11 is adhered to the card base.
Sentiment is from Altenew Sentiment Strips 2 stamp set. Stamp on black card with Versamark ink, sprinkle white embossing powder and melt embossing powder with heat tool. Cut sentiment strip, back with three layers of card strips so it is sturdy and adhere to card front with liquid glue.
Finish card with embellishment, Altenew Satin White sequins.
Card #2: Shaker card, Celebrating You Today

Steps to make card:
1. This card requires the use of a stamping platform. I use the MISTI Stamping tool.


2. Two card panels of A2 size (measuring 4.25” by 5.5”) is required, (i) 110lbs Neenah Solar White Cardstock which will be the card front panel, and (ii) an A2 size scrap card which will be used as a jig to hold the square teal card.
3. Mark the middle of the card panels. TIP: To find the mid point, draw two diagonal lines with a pencil from top left corner to bottom right corner and from top right corner to bottom left corner and the where these lines intersect, is the middle of the card panel.
4. Decide which die from the Altenew Crystal Frames die set that will be the shaker shape.
5. Choose a square die that will be larger than the chosen Altenew Crystal Frames die that will form the shaker shape. Place square die in the middle of the scrap card and die cut. Also use same square die and die cut in teal coloured card. Insert teal card square in die cut hole of the scrap card. See images above to help with these steps.
6. Everytime an outline image from Altenew Majestic Bouquet stamp is stamped on the 110lbs Neenah Solar White Cardstock which will be the card front panel, also stamp image (without moving stamp from stamping platfrom door) on the teal card square inserted into the scrap card. Hope the images above help with the steps.
7. Stamp outline images of flowers and leaves from Altenew Majestic Bouquet stamp using Altenew Crisp Dye Inks, Marigold, Lagoon, Mountain Mist, Volcano Lake, Pumpkin Pie, and Firebrick on front card panel and on the teal square card stamp in Versamark ink, sprinkle white embossing powder and melt embossing powder with heat tool. This will be the background of the shaker. So the flower image will be seamless but in different colours. .
8. Colour outline images, just a light shadow with flicks of the colour pencil using Prismacolor, PC1034 Goldenrod, PC918 Orange, PC905 Aquamarine, PC992 Light Aqua, PC122 Permanent Red
9. Place chosen die from the Altenew Crystal Frames die set in the middle of the card front panel and die cut. Also die cut same die on teal cardstock. The frame fo the die cut shape will be used to frame the shaker.
10. Now to assemble the shaker card. Every shaker needs a transparent front to hold in the shaker embellishments. TIP: Use plastic packaging or transparency film, which can be obtained at a lower price point than acetate. I use transparency film - got a box of this at a thrift shop and it’s going to last me for a very long time.
11. Cut the transparency film to a size that is bigger than the die cut shape of the Altenew Crystal Frames die and adhere with sticky tape at the back of the card panel against the die cut aperture. Align teal square card’s white stamped images to coloured images on card front panel and secure with tape at the back of the card front panel.
12. Then using liquid glue, adhere frame from Altenew Crystal Frames die on the front of the card panel against the transparency film. TIP: After applying liquid glue on a card, tap off on a scrap piece of paper to remove excess glue so it does not ‘ooze’ out when adhering to card.
13. The next step is to double up foam tape and adhere to back of card panel with the shaker aperture. This is to provide some height/depth to accommodate the shaker embellishment. The side of the foam tape will be sticky and will ‘trap’ some of the embellishments. TIP: Tap the sides of the foam tape on the inside of the shaker shaper with anti-static powder to remove the stickiness.
14. Add chosen shaker embellishment, Altenew Satin White Sequins onto the transparency film which is a space cordoned off by the foam tape. TIP: Able to add more shaker embellishments if added to surface with foam tape rather than the flat surface, i.e. tip shaker embellishments onto the transparency or acetate used for the shaker front.
15. Then place side folding A2 card base to shaker panel covered with foam tape. TIP: To allow wiggle/adjustment window, apply liquid glue onto foam tape. Press firmly allowing time for the panels to adhere firmly.
16. Turn over adhered card pieces and shake card to see the shaker element of the card at work!
17. Pick sentiment from Altenew Sentiment Strip 2 Stamp Set. Stamp sentiment on black card with Versamark ink, sprinkle white embossing powder and melt embossing powder with heat tool. Cut sentiment strip, back with three layers of card strips so it is sturdy and offset adhere to bronze card strip before adhering card front with liquid glue across the shaker window.
Card #3: Layering, Die Cut, and Emboss, Hugs

Steps to make card:
1. This card requires the use of the Altenew Majestic Bouquet 3D Embossing Folder as well as the Altenew Majestic Bouquet stamp set and coordinating die set.
2. Stamp larger flower layering images onto 80lbs Neenah Solar White Cardstock. Start with image A2. Skip the stamping of image A1 which is the outline flower image. Stamp flower with Altenew Crisp Dye Inks Chamomile, Marigold, and Mahogany Bark and for the flower centre, Morning Mist and Volcano Lake. Double stamped image A7 with Chamomile and Volcano Lake inks. Die cut flower with coordinating die.
3. For the leaves, stamp only the solid image, i.e. C2, D2, and E2 - so a single layer image of the leaves stamped with Volcano Lake ink. Die cut flower with coordinating die.
4. Align the die cut flower and leaves (one at a time) in the embossing folder and run through die cutting machine using the appropriate sandwich for a 3D Embossing Folder. The result will be embossed die cut pieces with beautiful dimension on the die cuts.
5. Arrange flower and leaves in an arrangement and ‘pick up’ with Press ‘N Seal. Place arrangement on card front and decide where additional leaves can be stamped. Again do not stamp all layers of the leaves but pick one layer. Stamp images G3 and H4 with Evening Gray ink in spaces allowed by the arrangement.
6. Turn over Press ‘N Seal with arrangement of die cuts still attached to the sticky side. Apply liquid glue to all the die cuts as well as the die cuts that overlap. Turn over the Press ‘N Seal and attack to card front. Slowly peel off the Press ‘N Seal and voila (!) the arrangement of flowers and leaves are done.
7. Use Altenew Jet Black Ink Spray for the background ink splatter.
8. Die cut ‘hugs’ in black card from Altenew Hugs and Hello Die Set four times and adhere together with liquid glue. This will give the die cut sentiment some sturdiness and dimension. Adhere ‘hugs’ die cut to card front.
9. Finally complete card by adhering a smattering of multi-sized Altenew Antique Gold Sequins to card front with liquid glue to complete card.
Card #4: Masking and Ink Blending, Hello

Steps to make card:
1. Stamp outline images of flowers and leaves from the Altenew Majestic Bouquet stamp set with Altenew Obsidian Pigment Ink onto Strathmore Bristol Smooth Paper measuring slightly larger than A2 card size, 4.25” by 5.5”.
T
IP: When ink blending, the edges tend to be darker during transition of ink blending tool from glass mat to card. So ink blend onto larger card, so card panel can be cut smaller to get rid of unwanted darker edges.
2.
Place masks of flowers and leaves from Card #1 onto
the stamped images.
3. Ink blend Distress Oxide inks in the following order from top of card panel: Scattererd Straw, Wild Honey, Crackling Campfire, and Candied Apple. TIP: Use a domed foam with an ink blending tool for smooth blending of the inks.
4. Light spray of water onto ink panel will set the oxide ink. The oxide ink get a shade brighter when sprayed with water.
5. Cut card panel down to A2 size (4.25” by 5.5”) and back with fun foam with double-sided tape and adhere to side folding A2 sized card.
6.
Die cut ‘hello’ in black card from Altenew Hugs and Hello Die Set four times and adhere together with liquid glue. This will give the die cut sentiment some sturdiness and dimension. Adhere ‘hello’ die cut to card front.
7. The sub-sentiment ‘Make a Wish’ is from ALTENEW Sentiment Strips Stamp. Stamp sentiment on white card with Versamark ink, sprinkle white embossing powder and melt embossing powder with heat tool. So there is white sentiment on white card.
Cut down sentiment to a strip.
8. Smoosh Distress Oxide ink Peacock Feathers onto sentiment strip to get a teal sentiment strip. Wipe off ink on heat embossed sentiment as it resists the ink and is white against the teal sentiment strip. TIP: White emboss sentiments on white card, and apply ink to sentiment strip so it matches the card background as the heat embossed sentiment will resist the ink.
9. Back sentiment strip with scrap card strips and adhere to card from on the ‘hello’ die cut with liquid glue.
10. Finally complete card by adhering a smattering of multi-sized Altenew Antique Gold Sequins to card front with liquid glue to complete card.
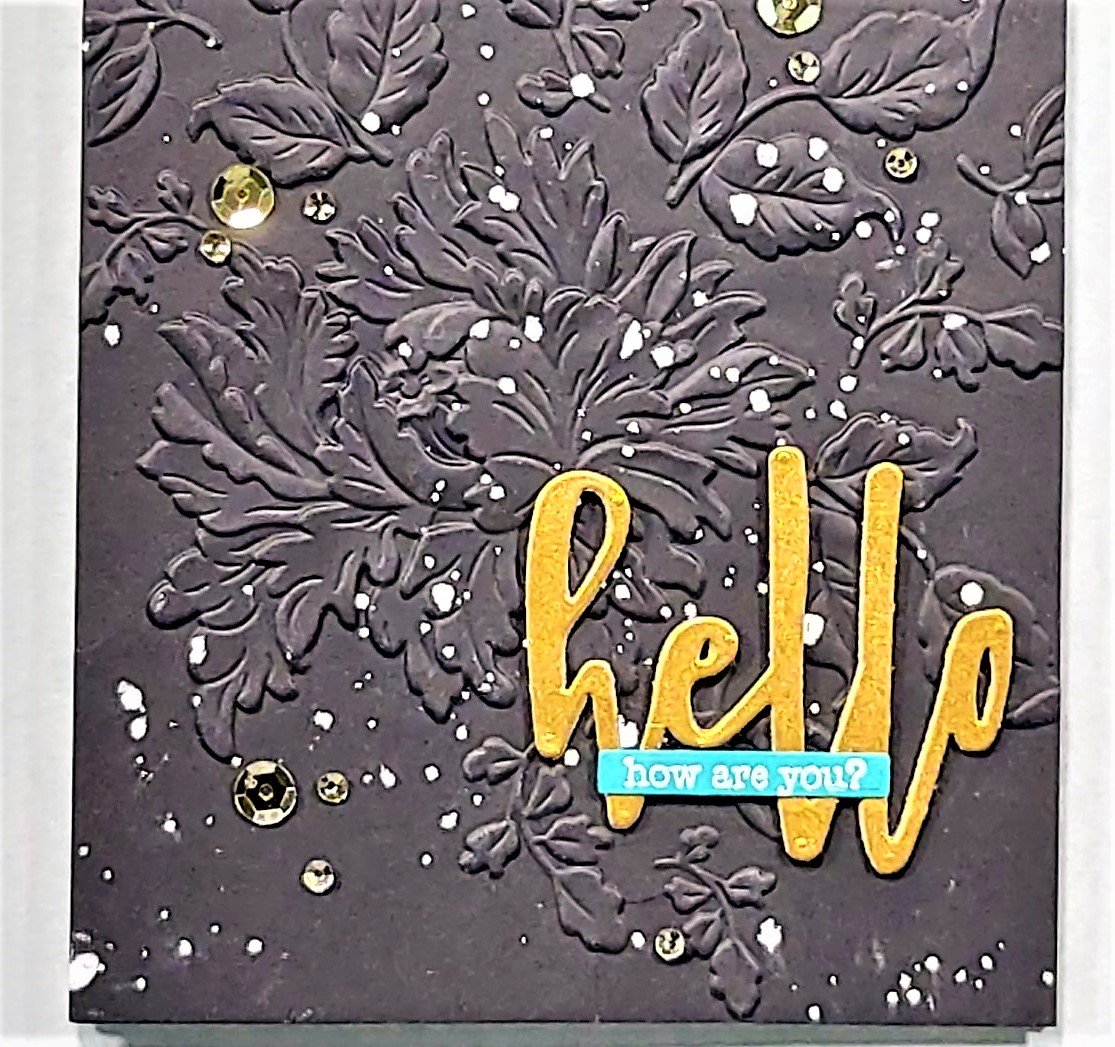
Card #5: Embossing, Hello

Steps to make card:
1. Take a 80lbs black cardstock measuring 4.5” by 5.75” and lightly spritz with water on front and back of card panel.
2. Place black card panel into Altenew Majestic Bouquet 3D Embossing Folder and run through die cutting machine using the appropriate sandwich for a 3D Embossing Folder.
3. Cut card panel down to an A2 size, 4.25” by 5.5”.
4. Back embossed card panel with fun foam
and attach to side folding A2 card.
5. Use Altenew Pure White Ink Spray to splatter onto embossed card panel.
6.
Die cut ‘hello’ in gold card from Altenew Hello and Hugs Die Set three times and adhere together with liquid glue. This will give the die cut sentiment some sturdiness and dimension. Adhere ‘hello’ die cut to card front.
7. The sub-sentiment ‘how are you?’ is from Altenew Hello and Hugs Stamp Set. Stamp sentiment on white card with Versamark ink, sprinkle white embossing powder and melt embossing powder with heat tool. So there is white sentiment on white card.
Cut down sentiment to a strip.
8. Smoosh Altenew Crisp Dye Ink Lagoon onto sentiment strip to get a teal sentiment strip. Wipe off ink on heat embossed sentiment as it resists the ink and is white against the teal sentiment strip. TIP: White emboss sentiments on white card, and apply ink to sentiment strip so it matches the card background as the heat embossed sentiment will resist the ink.
9. Back sentiment strip with scrap card strips and adhere to card from on the ‘hello’ die cut with liquid glue.
10. Finally complete card by adhering a smattering of multi-sized Altenew Antique Gold Sequins to card front with liquid glue to complete card.
Card #6: Glitter, Smile

This card requires the use of fine glitter which is not environmentally friendly. However do check out this blog post to see how I use glitter safely without harming the environment.
Steps to make card:
1. Cut aperture of a square onto an A2 sized card panel of 110lbs Neenah Solar White Cardstock with Altenew Fine Frames Square Die Set, using the largest of the three square dies.

2. Cut a piece of transparency film larger than the square die in #1. TIP: Use an acetate or plastic packaging if you do ot have transparency film. Transparency film can be obtained at a lower price point than acetate and well plastic packaging is free!
3. Stamp the largest outline flower image from the Altenew Majestic Bouquet stamp with StazOn Ink, Jet Black onto the transparency film. The ink should dry quite fast but give it a few minutes so it does not smear.
4. Flip over the transparency film and apply liquid glue with a fine tip (I use Art Glitter Liquid Glue with fine metal tip) and apply to portions of the flower and sprinkle with fine glitter. TIP: To ensure that the glitter only adheres to the glued portion of the transparency film dab transparency film with anti-static powder.
5. Continue with step #4 until all of the flower image is covered with glitter and leave aside to fully dry - it’ll take at least a couple of hours.
6. Now to assemble the card. for the background within the aperture I wanted quite a dark yellow. So rather than apply the Altenew Crisp Dye Ink Chamomile with a blending tool, apply ink directly to the card base to get a darker shade as well as a slightly textured look of the colour.
7. Stamp with Altenew Obsidian Pigment Ink a quote from Altenew Beautiful Quotes stamp just below the aperture on the card panel with the square aperture. Sprinkle with clear embossing powder and melt embossing powder with a heat tool.
8. Then take the transparency film with the glittered flower and place behind thesquare aperture that was die cut in #1. Once happy with the image that is seen through the aperture, secure with sticky tape at the back of the panel with the aperture.
9. Adhere aperture panel to A2 side folding card base with double-sided tape.
10. That’s the card. Did not add any embellishment as did not want to detract from the glittered shiny flower that shone through the aperture.
Packaging for the Gift Card Set for Her


1. This packaging is from a product that I had purchased. Pre-pandemic, there was a local stationery shop that would provide these A6 boxes and allow you to fill it with a variety of A6 card for a set price. I used to love going into this shop to get a variety of cardstock…paper therapy!
2. To customise this plastic box, make a belly band. Cut a strip of card measuring 3 1/8” by 10”. Stamped the strip with outline images of flowers and leaves from the Altenew Majestic Bouquet stamp, using the steps as in Card #2. Ink colours and colour pencils as well as techniques used are all the same as Card #2.
3. Then score the card strip at 1 1/8”, 2 1/2”, 7 1/2”, and 8 7/8” using a bone folder and a scoring board. Fold card strip at the scored lines, adhere some double-sided tape strategically and adhere belly band across the middle of the box cover.
4. In the inside cover of the box, adhere an image of the larger die cut flower and die cut leaf.
5. The sentiment on the front of the box is from Altenew Label Love. Stamp with Altenew Obsidian Pigment Ink, sprinkle with clear embossing powder, cut out sentiment and adhere to belly band on the front of the box with double-sided tape.
If you are still reading this post, thank you for taking the time and hope it has been an informative and interesting post.
Other Products Used:
ALTENEW Pure White Crisp Embossing Powder
ALTENEW Crystal Clear Crisp Embossing Powder
Art Glitter Liquid Glue with fine metal tip
Thank you for stopping by and do leave a comment if you have query or if you just want to say hi. Have a lovely day.